Right. I've been absent from the blog for over a month, I didn't show promised cuff pictures... bad blog owner! Bad! All because the first time in I don't know how many years I managed to catch a really, really nasty flu. Not only I felt downright miserable, and couldn't think straight for ridiculously long time, but it also knocked me off my feet (not in a good way), and getting myself back together took quite some time.
After I finally got to the point where I was able to do anything other that laying in bed and feeling sorry for myself, I decided that I would like to try my hand at making lockets. So I designed one, cut the pieces, painted them, etched them, and when it came to soldering, I found out that my trusty lovely little blowtorch is... too small. And can't get the piece hot enough, so the solder was balling up, and generally not cooperating with me. The logical step was, of course, to get a bigger blowtorch. Which I did last weekend, though figuring out what torch I would like to buy took some time. The fact that the post will not deliver gas cans complicated matters a bit, because I had to buy something for which I can buy gas containers in brick and mortar store- it really is not that simple, as I live in a rather small town. At first I wanted gosystem torch, but my local hardware store doesn't carry their gas cans. It does, however, carry campingaz torches and gas cans, and this is what I got. I had two options, and actually bought the one I didn't intend to buy at first. But that one has piezo ignition, and I'm terribly jumpy around gas devices without automatic ignition system. And what a monster of a torch it is! Here, have a picture (with my little iroda for comparison):
 |
| By the way, my table is not that messy when I'm actually soldering something... |
It runs, as you can see, on butane/propane mix, and reaches 1750 °C. And the flame is HUGE. But it soldered the joint I was battling with for more than a week at the first try, in few seconds. Good news is, you can buy replacement burners, and there is one particular model, called x1650, that gives you a fine flame, suited, as producer claims, for jewellery and model making. Bad news- it proved difficult to find, and virtually unavailable in the UK. I had to buy one from Germany, pay ridiculous price for postage, in effect paying for a burner about as much as for the torch itself.
After I soldered the one joint, I decided that my magnesia block alone was no match for that monster, and I need to buy more adequate soldering surface. Apparently, a charcoal block can withstand up to 3000 °C, and I don't have anything that reaches temperatures anywhere near that mark, so I bought one. I also bought soldering board, to rest the charcoal block on, because the flame produced by that big torch is big itself, and produces quite a bit of heat, therefore I found the set up I was using with my butane torch not satisfying. I may be over-cautious here, but better safe than sorry. Oh, I also got a third hand while I was doing my shopping, because I really had no clue how to solder on the bail I designed for the locket, and in the place I designed for it, without something of that sort. I never used one before, but I hope it will work well for me.
*I wrote the above yesterday, with intention of posting it today, and today morning my fine flame burner was delivered. I'm really happy with it: it can make a big flame, but also, contrary to the default burner the torch was supplied with, it can also make a really small one, which makes work a lot easier: the smallest flame of the default burner is still so big that I have problems seeing just what exactly is happening on the soldered piece. With that new burner, I can create wider range of flames, so it's way better suited to the type of work I use it for. It was totally worth all that rummaging through the internets and ordering from Germany.
Picture time!
 |
| There is not much outside difference between the two burners, but there is a big one performance-wise |
My shiny, new, as yet unused charcoal block on top of my old, much used and abused, crumbly but loved, magnesia block:
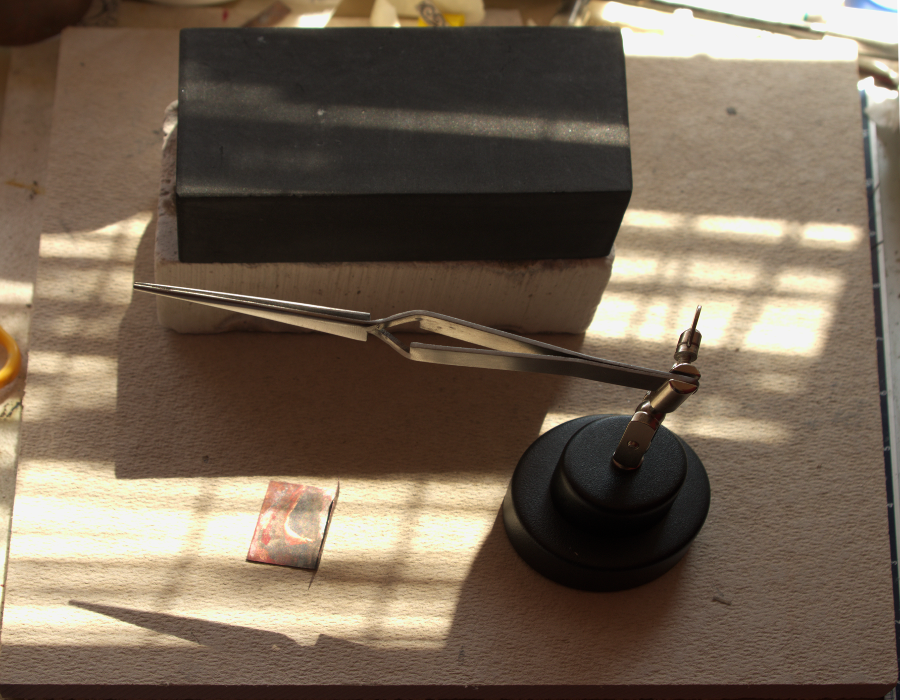
Charcoal block, soldering board, third hand, tweezers, beginning of a locket, and a really weird perspective:
And the beginning of a locket on my new charcoal block (I haven't used it yet, but I'm already awfully fond of it, can you tell?) :
 |
| Sorry, but you need to click on the picture to see it better. Why doesn't blogger have a decent gallery making options? Or is it just me? |
That's actually going to be the back of the finished piece. I'm planning red abalone cabochon on the front. Also, note the huge overspill of solder. That's all result of trying to solder this with my little torch. Once I applied the monster to it, it all decided that it can, in fact, flow, and there was what I can only describe as a solder flood. I just can't wait for all that sanding and cleaning it up....
I also have no idea if I'll manage to solder the hinge knuckles on properly... that remains to be seen. Honestly, that hinge terrifies me. I just hope I won't botch it entirely. On the side note, that wolf etching you see here is the first etching with nail polish as a resist I really like. I think I finally got the hang of using nail polish to achieve the effects I want.
I'm also thinking about writing a series of posts about recurring motifs in my designs - namely, wolves and ravens. I've written some "sketches", but I'm still not quite sure how to approach the subject. I know I'm going to start with wolves, but the piece I wrote on them needs a lot of polishing and finishing touches- I intend it to be something of an introduction to the species, but right now, I think, it's probably too technical, and possibly I'm writing about too many different aspects for just one post. I will have to do some hard thinking about it, as I wouldn't like to bore the living hell out of readers ;) What I know I want to do with that planned series, is to write about biological, ecological and cultural aspects of them. Thing is, for me by far the most interesting of these are ecology and biology, with cultural bringing up the rear, a loong, looong distance behind the former two, and I tend to get overexcited with technicalities and details. But the again, being wolf researcher and behaviourist is my unfulfilled childhood dream, so what would you expect ;)
Which brings me nicely to my other plans, though those are a bit nebulous at this time. My other big dream was to be palaeontologist/evolutionist. If something distracts me from designing and making jewellery, it's likely to be bio/palaeo/evo stuff. Synapsids, and their evolutionary line, are what I'm especially interested in. I'm writing about this, because I was thinking about somehow linking all my passions together in my jewellery designs. I'm thinking, vaguely right now, about adding prehistoric creatures to my designs. It would be in similar style to what I'm making now, probably, but the creature featured would be something that is, sadly, no longer with us. Like Inostrancevia. Or Homotherium. Or Diictodon. Or something ;) The idea gets me all excited,but I'm not sure how it will work out in the end.
Here, have a Homotherium latidens to illustrate that paragraph:
A word on the cuff: I don't like how the etching turned out, and decided it needs a bit of touch-up. With hand engraving. I have a set of hand gravers, I just need to learn how to use them properly, so that may take some time. I'm not ready to discard that cuff just yet. I hope it's salvageable.
Soo... lockets, maybe palaeo stuff in designs, probably series of posts about wolves and ravens, hand engravings... that's what I'm working on right now, and I hope there will be no other flus to turn me into some kind of particularly immobile, sloppy rag wrung to within an inch of its life, and I will be actually able to do all of the above :)
Till the next time (preferably not in a moth's time)
Kasia