Showing posts with label workbench. Show all posts

Friday, 14 August 2015

Delft clay casting pt.2: dealing with gas porosity, ring band moulds, and something akin to progress.

I spent another week learning how to cast metal. And today got pretty close to obtaining satisfying results. I'm not quite there yet, but I saw the light at the end of the tunnel, so to speak.
Last week I've ordered 20g of pure silver casting grain, to make more of my 30%silver 70%copper shibuichi alloy. I made about 5g (as I already had 10g of alloy, and I didn't want to melt all of it at once) more, and tried to cast something presentable.

It was a right amount for the wolf model, but I was still getting loads of porosity. Yes, I learned that those bubbles I was getting in the casts are result of gas porosity: apparently, gas can dissolve in molten metal. That was news for me. And using flux is supposed to eliminate it. However, I was using flux, and still getting the bubbles in my pieces.

So I went back to browsing the web, and at some forum (I really don't know where, sorry) read that if there is even a little bit of solder on the metal you melt, it will behave terribly in castings.

That got me thinking. I melted art clay pieces that I just gave up on. I did my best to clean them, but it was possible that some solder made it into the alloy. So I made another 15g from scratch, using only the casting grain and well-cleaned copper. And that actually helped a bit.
See here:
It's so tantalizingly close to good cast, I don't even know if I'm happy or frustrated.
 Sorry about the picture. But you can see that there are almost no pores here: apart from that huge one between the ears, and one on the paw, and, I think, some tiny ones on the snout.
I wouldn't mind the one on the leg that much, actually, but that one smack right between the ears just won't do. Next time I'm casting this piece, I'm going to add a bit more flux and see if that helps. There are more bubbles on the back, but that can be dealt with. But on the front I have very limited options for clean up available. Still, it's progress.

I also have to work on my ring band moulds, as I can't seem to find a good way of making them, and the metal solidifies in the funnel, without filling the mould itself. I, again, searched the net for pictures of how others make their moulds, and found one approach I didn't tried yet. I hope this one will work for me.

Apart from casting, that takes up huge chunks of my time, I also decided to make another cuff, and made project for another one. I could really use guillotine cutter, or good metal shears, because, even though I'm getting comfortable with using my saw, and getting to even like it (and that's a huge surprise for me, let me tell you), I absolutely abhor cutting through such thick sheet. I mean, it takes up to 15min to cut out 15cm x 2.5cm blank for the cuff! And after passing some length mark ( somewhere between 5 and 10cm ), my saw frame gets in the way, and bangs against the sheet, and keeping it going in straight line is tricky.
Anyway, here's how the cuff looks right now:
Unfinished cuff
It's close to finished, but I need to clean the etching up a little bit, and then of course oxidise it. I formed it, and then slapped myself in the forehead very hard, because I need to use gravers somehow on the etching! That means I need to flatten it again. I get overexcited sometimes, adding myself more work. But that's minor issue.

I also almost finished those lockets I've been working on for forever now. I have to clean them up, add all the finishing touches... and figure out what to do about a teeny-tiny slit that appeared in one joint on the raven locket. That's major reason as to why I haven't finished them yet.

So, that's it for now. I hope I'll have finished, nice castings next week!
Till the next time!
Kasia.

Friday, 7 August 2015

Delft clay casting, pt1: tools issues, copper issues, and a lot of issues in general. And shibuichi.

If you're following me on google+, you may know that I recently ordered supplies for casting. I have a lot of scrap copper laying around, and I wouldn't be able to make anything out of it, so I've decided to try my hand at casting. This way I could still use that copper, and it wouldn't be wasted.
 So, I've got my waxes, crucible, tongs, and of course the delft clay, and got to casting. And found out that melting copper is a pain. It either wouldn't melt at all, or wouldn't stay liquid long enough for me to pour it into the mould. It was frustrating, to say the least.
Tools!
I've spent 1.5 day trying to melt the copper. Then, at the second day, I manged to do this, and it aaalmost stayed liquid long enough to pour it, but it hardened as it was flowing toward the edge of the crucible. I deemed that partial success, and was eager to try again, and that's when I noticed this:
 
Poor torch :(
I did manage to melt the copper, but the plastic casing of my torch... not exactly melted, but, well, did what you can see in the pictures. I got pretty scared it wouldn't work, or that I wouldn't be able to change burners, but after it cooled I found out that I can remove the burner and attach another, the torch works, and the only damaged part is the upper right hand side of the casing closest to the nozzle.
Thankfully, the damaged part isn't anything vital for the torch operation, and the damage is superficial, and limited only to this side.
Feels ;(
But it's pretty clear that one won't melt copper without taking damage. So I had buy another. At first I wanted to order something via internet, but then anything I liked was expensive, and I would have to wait another several days before I would be able to continue my casting experiments, so in the end I went shopping, remembering that the shop I got this torch stocked also a bigger one, without any plastic parts near the nozzle.

It's huge and quite scary
This one makes the biggest flame I ever handled, and unfortunately doesn't have automatic ignition. By now, I got the hang of firing it up, but the first time was scaaryy. Sorry for the crappy pictures, by the way.
Huge flame or not, I still had problems melting the copper. I'm not sure what I'm doing wrong, but I can get it to a semi-liquid state, and then... it suddenly cools and solidifies. I don't know if I direct the flame wrong way or what, but that's what happens.
So I got rather discouraged and angry. I also remembered I had a little bit of scrap silver, and decided to see if I can melt that. And if I can pour it into the mould. It went much easier, though I had to try 3 or 4 time before I managed to get it into the mould without the metal solidifying half-way through.
However, I had only 2.8g, not enough to cast anything. But at least I got to practice pouring the metal. It's not that easy.
But I still wanted to melt that scrap copper. And today I read about Japanese copper and silver alloy, called shibuichi. It comes in different ratios: one is basically sterling silver, but there are other kinds with bigger amount of copper. It can be 90%copper 10% silver, or 95%copper 5%silver, or 60%silver 40% copper, and so on. There are also mixes with tiny percentage of gold (like 1%). what's more, it melts in lower temperature than copper and pure silver. I decided to make 70% copper 30%silver mix.
I thought I would have to melt copper entirely before adding silver. But, typically for Murphy's Law, when I needed molten copper, it just wouldn't melt. I got angry, and tossed the silver in when the copper wouldn't get to even the half-liquid state. The silver melted right away. And, surprise, surprise... suddenly I had crucible of fully liquid metal. It took seconds for copper to melt as well once the silver was introduced.
I managed to get it into the mould as well, and quite easily at that.
Crucible with a little bit of metal solidified near the edge. The red stuff is borax. Not sure why it's red.


I don't have enough of that alloy to cast any of the models I have, not even enough for one thin ring band, but I'm going to buy a bit of silver casting grain, and make some more.
It has a lovely colour, kind of silverish-brown with a light pink undertones. It reminds me mostly of pink gold, though it's lighter in colour.
I have only one, bad picture, but here it is:
Partial success at casting
The yellow is patina, it can be easily removed with sand paper. It's not anywhere near perfect, but I'm happy I can melt it, and keep it liquid long enough to obtain the cast. I'm not sure why there are those tiny dimples in the casting. I'm going to rummage through the internets and try to find out.
Ufff... so that was the first week of delft casting experiments. I'm definitely more encourage to keep learning this now that I actually have metal that I can melt. The details wouldn't be bad if it wasn't for those bubbles, holes, or whatever these are.
I hope the next week will be more better!
Till the next time,
Kasia.
Follow my blog with Bloglovin

Sunday, 12 July 2015

That weird salt water etching

Ah, salt water etching. A technique I use very often. Just to remind you (or introduce you to, if you've never heard of it) what it is: it's an etching technique, in which the traditional acids or mordants are replaced with salt water an weak electric current. The piece to be etched is submerged in over-saturated saline solution, and attached to positive charge. Scrap piece of metal is submerged as well, attached to negative charge. It's an electrolytic process.

Etching... see the bubbles? It's a negative terminal

 As with any etching, you need some kind of resist, and from what I read, finding one that works is trickier with this process than with traditional etching. Permanent markers, for example, are useless, as they wear off way to fast. I find nail varnish to be the best resist. Acrylic paint also works, but is more prone to coming off the etched piece. Nail varnish generally last throughout the whole process.

Lately, I've been working on bracelets. And I encountered problems I never had with this technique before. Depth of etching varied not only from piece to piece, but also within one piece alone. The texture of etched parts also varied. It's weird. And I don't get why is this happening. All pieces etched for the same amount of time, 3h. I always etch for this amount of time, as this gives (usually) a really nice, deep etch.

If I ever before had any problems, it was with too shallow etchingt, if I used solution so saturated with copper, that it wasn't as effective as before. But this is to be expected.

I, however, never had a piece that etched through. That is, until recently. I had to discard one project, because there were holes in some places. Again, the same sheet gauge, the same amount of time. Weird.

The first, slightly botched attempt at a cuff
So this was the first in the series of bracelets. Remember I was working on a wolf cuff? I didn't like the result, forgot about it for a while, and then decided to have a second go at it, with a bit different design. I would like this one if it wasn't for the wolf you see here, and another one closer to the end of the cuff.
Anyway, what I really do like about this cuff, is its texture. See here:
Texture of the first wolf cuff.
The texture of the etched parts is gorgeous. The etching is deep, texture is grainy, and just really nice. It looks like this on the whole cuff. This cuff etched for three hours, in freshly mixed saline solution.

Now, after seeing etching results, I decided to have another go, as I felt I can't sell this to anyone. So I made another wolf cuff.
The second wolf cuff, with better etched wolves
Here, I also wasn't 100% happy with the etching, but decided this one is good enough to put up for sale. I guess other people liked it better than me, as it's already sold. Anyway, I liked the image on this one, but the texture wasn't as nice. And uneven to boot. On one end it resembles the texture on the first cuff, on the other end, the etching is shallower, and the texture is... not as interesting.
Texture on the second cuff
This picture shows the texture around the middle of that cuff. You can really see the difference, but it still is somewhat similar to the first cuff. But near the end...
Texture on the second cuff, near one end
 The grain is sparser here, not to mention those... lines? grooves? I have no idea what caused this. As I mentioned, etching here is shallower, but this is not that weird, considering that it etched in already used solution. What is weird, however, is that the etching doesn't have uniform depth: it's deeper on one end than the other. It also etched for 3h.

The next cuff I made was the raven cuff.
Raven cuff
I'm awfully happy with etching on this one. However, that one is weirder that the last. It etched in fresh solution. For three hours, as is the case with all of them. And the etching is a lot shallower than on the first wolf cuff. And it also differs in depth on this one! I don't get it!
Look:
Texture on one end of raven cuff
Here, it's grainy, and of decent depth. Not as nice as on the first wolf cuff, but pretty nice. No grooves, lines, or any other weird stuff ( and yes, I know I use the word weird a lot in this post).
And the other end?
Why is this happening?!?
A lot shallower, not as grainy, but still uniform texture. If anyone have any idea as to why this may be occurring, I sure would like to know!

And that's not all. After the wolf cuff sold, I decided to make another wolf cuff, with different design of course. So I cut the strip out of the same copper sheet I used for all those bracelets, put it in solution, etched it for three hours, cleaned it... and almost had a fit. Why? Because of this:

A hole!!!
Holes! Holes in the metal! Ugh!
And not just one at that!
I didn't bother with cleaning it properly, there was no point. But, what is, again, weird here? Of course, it etched through only on one side! The other one looks like this:
The end without holes
It's etched to about the depth I was expecting, texture is bizarre, true, but overall it's what I thought I would see after removing the nail varnish. Well, that one went to a certain box, and waits there until I finally decide whether I want to try delft clay casting or not. It would be shame to waste all that copper, after all.

Oh, and I also had one more unpleasant surprise. Remember titanium pieces I'm working on? Well, I made copper parts, cut them, painted them, put them into etching... and one etched perfectly, and the other one etched through, and I had to start over. And they both were etching at the same time!
So frustrating!

As I mentioned, I have no idea why this started happening. It doesn't make much sense to me. The set up is the same. The salt I'm using is the same. The source of electricity didn't change, and nor did the voltage. It's just so weird. Anyone has any ideas?

Till the next time!
Kasia

Follow my blog with Bloglovin

Monday, 29 June 2015

Playing with titanium

Last Friday I did something very, very out of character for me: I bought something on an impulse. I never buy stuff impulsively. Never, ever. And this one time I did. I ordered some titanium. Yes, titanium. A small piece: 2.54cm x 15.24cm, and 0.4mm thick. I was really surprised when it was delivered today: talk about fast shipping!

The monster... aka small, thin titanium strip.

Anyway, since Friday I was wondering if I will be able to even cut it, as titanium is notoriously hard metal. I had also no idea what I would make out of it, until yesterday.
Quick and dirty "concept sketches". I started with the wolf one.

Naturally, when it arrived, I just had to play with it! What I can say after one day of handling titanium, is this: it's incredibly light metal. Honestly, I was surprised. Almost felt like aluminium. It's lighter than copper, but much, much stronger (obviously). The strip I ordered came annealed, so it's soft, as far as titanium goes, but it still is pretty hard. I was able to bend the strip a bit, though not permanently. It has also kind of satiny feel to it. I really can't describe it better than that.


I was a bit worried about my saw blades. I just couldn't imagine how many of them I would use up cutting through the metal (or, indeed, if it will be at all feasible with the blades I have). I'm happy to say it went better than I expected. I cut out a teardrop shape, about 2.5cm in height, and maybe 2cm in the widest place.
The titanium blank, and all the saw blades that perished cutting it out.

I used up three blades on that. The last one still had some teeth left.
Click for close up on those poor blades

Now I'm wondering if I should buy better blades just for titanium, or if there's no point in that. I wouldn't like to spend £4 on 10 blades only to find out they dull as quickly as the ones I'm using right now.

After that was cut...
The first blade was done for.

After I cut the shape out, I had a bit tidying up left do do, especially in one place. I filed the sides down a bit, and this went pretty fast. I was surprised, I thought it would be much more difficult.

By the way, the little teardrop shape can't be bent. I mean, I just used my hands, and didn't apply unreasonable force, but it's really stiff. I'm trying to imagine hardened titanium, and I can't ;P

The shop I ordered the titanium from had also niobium, and I was tempted to buy that instead, but there is one little, teeny-tiny issue that was the key factor in my decision to buy the dreaded titanium after all. Niobium has some awesome oxides, that come in an awesome array of colours. Titanium has pretty much identical colour range, with one difference: you can colour titanium with a torch, but, as far as I know, you can't do that with niobium. And I didn't feel like playing with high voltages required for anodising niobium. I mean, they start low, around 10V, but go beyond the 100V mark, and that's positively scary.

The pendant I started working on requires only one colour: deep blue. There will be another part of titanium visible, but I plan to leave that one its normal silver-gray colour. The second one will require light blue and gold.

As I was experimenting with flame colouring today, I made a mistake and overheated the piece. That changed the colour I was aiming for, the deep blue, to light blue with some whitish splotches. So I had to sand that down, and start again. This way, I got an answered to my question: will I be able to obtain two colours on one piece? The answer is yes.

Heat coloured titanium. Not perfect, but just look at those hues!
When you heat titanium, its colour changes somewhat in this sequence: first, it's getting a bit more... silver-ish. Then, a bit brownish, that it gets a really nice golden colour, and then the colour shifts towards blue spectrum: first a purple, then deep blue, then sky blue, then gets almost white. From what I read, the next colours would be greens and pinks, and finally dark grey, almost black. I didn't get to those colours though.

 What is important here, for me, is that when I was making a second attempt at deep blue, I wasn't working on an entirely clean piece. I sanded a part of it, but another part stayed sky blue. Thanks to this, I know now that for the second piece I can easily obtain sky blue and gold on one piece of metal. The coloured part didn't change one bit.

 I must say, I absolutely love the wide range of colours you can create this way! Flame colouring titanium is much easier than it is with copper: I know, I tried. Apparently, I'm hopeless with obtaining heat patina on copper

Now I just have to wait for diamond drills bits to arrive, because you can't solder titanium, so I will have to rivet it and the copper together. I did make first opening in the copper part of the pendant today, just to see how the two look together.
First opening made.
It looks better than in this picture. I didn't cut all of them, as it was pretty late already, and I though my neighbours wouldn't be very happy if they had to listen to drilling for much longer ;)

After one day experience with titanium, I can say that it's definitely an interesting material to work with, and its colourful oxides provide a whole range of possibilities. I can't way to finish this piece, and to see how it will turn out!

I'm also wondering if my engraving bits would survive engraving titanium... they do have diamond tips, and I have two sets of them, but still. I wonder how long they would last...

Till the next time!
Kasia


Thursday, 23 April 2015

Torches, charcoal blocks, soldering boards, lockets in progress and a whole heaps of plans.

Right. I've been absent from the blog for over a month, I didn't show promised cuff pictures... bad blog owner! Bad! All because the first time in I don't know how many years I managed to catch a really, really nasty flu. Not only I felt downright miserable, and couldn't think straight for ridiculously long time, but it also knocked me off my feet (not in a good way), and getting myself back together took quite some time. 
After I finally got to the point where I was able to do anything other that laying in bed and feeling sorry for myself, I decided that I would like to try my hand at making lockets. So I designed one, cut the pieces, painted them, etched them, and when it came to soldering, I found out that my trusty lovely little blowtorch is... too small. And can't get the piece hot enough, so the solder was balling up, and generally not cooperating with me. The logical step was, of course, to get a bigger blowtorch. Which I did last weekend, though figuring out what torch I would like to buy took some time. The fact that the post will not deliver gas cans complicated matters a bit, because I had to buy something for which I can buy gas containers in brick and mortar store- it really is not that simple, as I live in a rather small town. At first I wanted gosystem torch, but my local hardware store doesn't carry their gas cans. It does, however, carry campingaz torches and gas cans, and this is what I got. I had two options, and actually bought the one I didn't intend to buy at first. But that one has piezo ignition, and I'm terribly jumpy around gas devices without automatic ignition system. And what a monster of a torch it is! Here, have a picture (with my little iroda for comparison):
By the way, my table is not that messy when I'm actually soldering something...

It runs, as you can see, on butane/propane mix, and reaches 1750 °C. And the flame is HUGE. But it soldered the joint I was battling with for more than a week at the first try, in few seconds. Good news is, you can buy replacement burners, and there is one particular model, called x1650, that gives you a fine flame, suited, as producer claims, for jewellery and model making. Bad news- it proved difficult to find, and virtually unavailable in the UK. I had to buy one from Germany, pay ridiculous price for postage, in effect paying for a burner about as much as for the torch itself. 
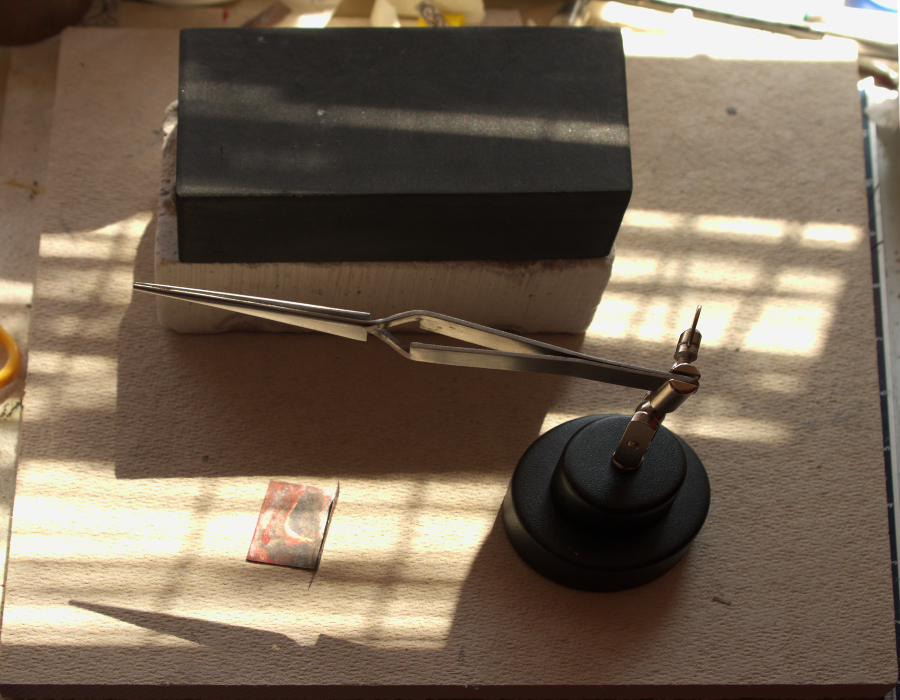
After I soldered the one joint, I decided that my magnesia block alone was no match for that monster, and I need to buy more adequate soldering surface. Apparently, a charcoal block can withstand up to 3000 °C, and I don't have anything that reaches temperatures anywhere near that mark, so I bought one. I also bought soldering board, to rest the charcoal block on, because the flame produced by that big torch is big itself, and produces quite a bit of heat, therefore I found the set up I was using with my butane torch not satisfying. I may be over-cautious here, but better safe than sorry. Oh, I also got a third hand while I was doing my shopping, because I really had no clue how to solder on the bail I designed for the locket, and in the place I designed for it, without something of that sort. I never used one before, but I hope it will work well for me. 


*I wrote the above yesterday, with intention of posting it today, and today morning my fine flame burner was delivered. I'm really happy with it: it can make a big flame, but also, contrary to the default burner the torch was supplied with, it can also make a really small one, which makes work a lot easier: the smallest flame of the default burner is still so big that I have problems seeing just what exactly is happening on the soldered piece. With that new burner, I can create wider range of flames, so it's way better suited to the type of work I use it for. It was totally worth all that rummaging through the internets and ordering from Germany.
Picture time!
There is not much outside difference between the two burners, but there is a big one performance-wise


My shiny, new, as yet unused charcoal block on top of my old, much used and abused, crumbly but loved, magnesia block:


 Charcoal block, soldering board, third hand, tweezers, beginning of a locket, and a really weird perspective:


And the beginning of a locket on my new charcoal block (I haven't used it yet, but I'm already awfully fond of it, can you tell?) :

Sorry, but you need to click on the picture to see it better. Why doesn't blogger have a decent gallery making options? Or is it just me?
 That's actually going to be the back of the finished piece. I'm planning red abalone cabochon on the front. Also, note the huge overspill of solder. That's all result of trying to solder this with my little torch. Once I applied the monster to it, it all decided that it can, in fact, flow, and there was what I can only describe as a solder flood. I just can't wait for all that sanding and cleaning it up....


I also have no idea if I'll manage to solder the hinge knuckles on properly... that remains to be seen. Honestly, that hinge terrifies me. I just hope I won't botch it entirely. On the side note, that wolf etching you see here is the first etching with nail polish as a resist I really like. I think I finally got the hang of using nail polish to achieve the effects I want.


I'm also thinking about writing a series of posts about recurring motifs in my designs - namely, wolves and ravens. I've written some "sketches", but I'm still not quite sure how to approach the subject. I know I'm going to start with wolves, but the piece I wrote on them needs a lot of polishing and finishing touches- I intend it to be something of an introduction to the species, but right now, I think, it's probably too technical, and possibly I'm writing about too many different aspects for just one post. I will have to do some hard thinking about it, as I wouldn't like to bore the living hell out of readers ;) What I know I want to do with that planned series, is to write about biological, ecological and cultural aspects of them. Thing is, for me by far the most interesting of these are ecology and biology, with cultural bringing up the rear, a loong, looong distance behind the former two, and I tend to get overexcited with technicalities and details. But the again, being wolf researcher and behaviourist is my unfulfilled childhood dream, so what would you expect ;)


Which brings me nicely to my other plans, though those are a bit nebulous at this time. My other big dream was to be palaeontologist/evolutionist. If something distracts me from designing and making jewellery, it's likely to be bio/palaeo/evo stuff. Synapsids, and their evolutionary line, are what I'm especially interested in. I'm writing about this, because I was thinking about somehow linking all my passions together in my jewellery designs. I'm thinking, vaguely right now, about adding prehistoric creatures to my designs. It would be in similar style to what I'm making now, probably, but the creature featured would be something that is, sadly, no longer with us. Like Inostrancevia. Or Homotherium. Or Diictodon. Or something ;) The idea gets me all excited,but I'm not sure how it will work out in the end.
 
Here, have a Homotherium latidens to illustrate that paragraph:


A word on the cuff: I don't like how the etching turned out, and decided it needs a bit of touch-up. With hand engraving. I have a set of hand gravers, I just need to learn how to use them properly, so that may take some time. I'm not ready to discard that cuff just yet. I hope it's salvageable. 
Soo... lockets, maybe palaeo stuff in designs, probably series of posts about wolves and ravens, hand engravings... that's what I'm working on right now, and I hope there will be no other flus to turn me into some kind of particularly immobile, sloppy rag wrung to within an inch of its life, and I will be actually able to do all of the above :)  
 
Till the next time (preferably not in a moth's time)
Kasia 

Monday, 16 March 2015

Commence operation cuff!

Sooo.... today I got my 0.9mm copper sheet order (and if I like making cuffs I will have to place another, bigger, one) and just had to start experimenting with making an etched cuff straightaway! And then... I couldn't find any suitable container. I etch pendants and earrings in old, ugly glass, but a cuff is obviously too big to fit in it. I have one plastic container that would be of a suitable size for etching that cuff, but right now it contains used up solution from previous etching, waiting for it to evaporate (as you can't pour it down the drain due to high copper content), or for me to finally get around to buying kitty litter (to soak it all up). I managed to find an appropriate receptacle, but all of that meant that I couldn't start until after dinner - the container in question held mushrooms ;) Anyway, after I prepared saline solution, it was time to work on the cuff itself... which led me to deeply regretting the fact that I don't have a guillotine cutter. Nor metal shears. Originally, I wanted to start working on two cuffs simultaneously, but after sawing out a blank for one, I definitely wasn't in the mood to do this all over again.

Cut out pre-cuff

Actually, I originally ordered that sheet so I could practice making rings... and then decided to make a cuff. To quote one of my favourite books: "attention span of a teabag". And I will probably leave myself a strip of that copper for those rings... if I won't forget to do that ;P Also, after the etching is done (and it's in process right now, because obviously I don't have anything better to do at 2 am than to etch a cuff... I do weird thing like that at weird times like this), I will have to anneal that strip a bit, and then smooth it out... I really couldn't be bothered to do this today (or yesterday, if you look at time and date)


Here it is after filing, smoothing out and rounding the edges. And drawing rough outlines of running wolves. Sorry for the bad picture. And yes, I did smooth and straighten it a bit, but there are still some bumps that wouldn't go away without softening the copper a bit.


I also tried nail polish as a resist for etching, and it works the best of all the media I tried up to date. I doesn't peel of, and is easy to remove after etching. But it's a bit more difficult to draw with than paint. Oh, the high tech that goes into making my etched pieces: nail polish, applied with a toothpick. And a mushroom container. 
Aaaaaand I just realised I put it into etching without adding my usual swirls... or scrolls... or spirals... ugh!!! Oh, well.

And here it is, etching
I really couldn't figure out how to attach the cuff to the wire at first. But then I thought about etching done the traditional way, and how, in just about every tutorial I saw, people suspend their projects with sticky tape, and decided to try something similar : I'm not sure, though, if the tape is fully in contact with the copper in the critical spot: that is, the one without nail polish on it. I did paint most of the back, but I wasn't sure if nail polish would, or wouldn't, stop the current, so I left small area uncovered. I sure do hope that there's no etching going on in that spot, but that will remain to be seen. It's been etching for 2h now, so I will stop the process, check how does it look, and think whether or not I would like to add scrolls ( they would be quite faint, if I etch them for just an hour). It should be finished tomorrow (or today, only much later ;) and I should have pictures of the finished piece by Friday ( that is, if I finish necklace and earrings I'm working on by then ). And now I'm going to bed. Finally ;)

So, have a great week, and till the next time :)
Kasia

Friday, 13 March 2015

Finger protection tape

I have a terrible, terrible tendency to hurt myself while filing something. I usually file down not only the piece I'm working on, but a bit of my fingers as well. So I started to look for something that would protect my hands during those kinds of activities ( because, clearly, paying more attention to what I am doing works only until I get bored to death by something so repetitive as filing, and my mind starts to wander, and... I end up with a scratch again. I remembered reading somewhere ( I think it was etsy metal blog? But I'm not sure, it was, if I'm not mistaken, about 2 years ago. Maybe 1.5. ) about alligator skin finger protection tape. I looked for it, found it, and bought it to try it out (kind of veni, vidi, vici sequence I did there ;P So... quaeri, invenivi, emi :D). 

It's so cool it got its own dramatic picture!
It works really well! But, in case you don't know what alligator skin tape is... It's a fabric, self-adhering tape, that comes actually from medical industry - it's used as bandage, for example. But it's great for jewellery makers, for several reasons:
- it has quite... loose? (that's not exactly the word I'm looking for, but you can see what I mean if you look at the picture) weave, that creates a great texture on the tape, meaning you have a really good grip on whatever you are working on.
- it's quite flexible, and thin, so you can wrap your fingertips with it, and still have a decent sense of touch
- although, as I mentioned, it's thin, it's also pretty durable, so even one layer can protect your fingers from those dreaded files. What leads us to...
- you don't need to wrap your fingers with many layers to get protection. I usually go for two or three, and it works very well for my purposes.
- It adheres only to itself, and to nothing else, so you're not left with any sticky residue after using it, and it's really easy to take off of your fingers.
- Also, a bit on the side note, I actually reused several wrappings - I managed to slip them off my fingers, and, as they were in pretty good condition, put them on few times more, and they worked just as well ( I hate wasting something that can still be used )
- I just started to use it, but, based on what I learned so far, it seems that the 27m (90ft) roll I bought will last for quite some time.

I used it when I was filing, sanding, polishing, sawing jump rings (I managed to cut myself on several occasions while doing it), and also when I was making some chains. It worked brilliantly during all of these activities. I was really happy to find that it helped during chain-making process - I always end up with sore, slightly swollen parts of my fingers (it's not really surprising, as using pliers in both hands for 3h+ is prone to somewhat irritate your hands). I experimentally wrapped the most vulnerable parts of my fingers in the tape, not really expecting anything - after all, its just thin, no padded, woven tape - and I was rather surprised when it worked. Two of my fingers were a bit sore after I finished the chain, but nowhere near to extent they would be without wrapping them. I actually considered the possibility that the tape will make it worse - as it wrapped my fingers in sections where quite a bit of bending and flexing occurs - so I was positively surprised. Next time, I intend to add a bit of some padding material between my fingers and the tape, and I'm quite sure now that it will eliminate any discomfort form using the pliers.


That's how it looks like on fingers... after a day's work. I don't know why it's this colour here. The colour is better on the first photo.


Also, I would like to add that, after I first wrapped my fingers in that tape, I had to give myself a few minutes to get used to it. It seemed a bit stiff at first, and whenever I was manipulating something I had an urge to slip the tape off my fingertips to better feel whatever I was holding, but after a short time I got used to how the tape felt on my fingers, and the wrapping itself became a bit softer. I definitely prefer it to protective gloves. 

To wrap it all up (no pun intended, I swear!), I think that it was a great buy, and it's a great product. I protects fingers from abrasions, cuts, scratches and scrapes, while still providing good grip and flexibility.

Hopefully, there will be no more sore fingers for me in the future :)
Unless I forget to wrap them with that tape. Knowing my memory, that may just happen.
 
Till the next time!
Kasia

Monday, 19 January 2015

Sealant quandary

I've spent last few weeks trying to find a good sealant for copper. I generally find people are using things like lacquer or wax as the way of sealing metal for jewellery. And that's where problems begin: someone throws name of some lacquer or something like that and that's it... but does that person know if it's safe for someone to wear item sealed with it? Because if it's safe for roofs, it doesn't necessary means that potential customer won't develop a nasty rush after wearing a piece of jewellery coated with it. Or, there is that great big "renaissance wax camp". Just one problem: waxes, and I assume it's true for the "wax of all waxes" too, tend to melt/soften in higher temperatures and human body gives of heat, after all. So it doesn't seem like a good way of preventing the green discolouration of the skin after wearing copper (and that's my main reason for researching sealants). Also, I recall reading something along those exact lines: that renaissance wax is great for sealing patinas (with the exception of fire patinas, but those are, partially, impossible to seal due to their nature), but doesn't prevent that green staining from developing.

And finally, the most frustrating thing for me: I managed to find three products that are supposed to be safe for wear, long lasting, preventing unwanted oxidisation and without tacky, artificial feel some other lacquers/sealants supposedly give to the piece, and... two of them are, apparently, impossible to find in the UK, and the third is available in a very limited range ( no spray, only liquid form) and expensive to boot. AAAAaaaaaaAAAAAA!!!!!!! I can happily slather some wax on the outside of, for example, pendant, but what about the side that faces the body? Or what about the chain, for that matter? Preventing oxidisation is fine for me, but I don't want my customers turning green ( and, I assume, most of them wouldn't want that either) and waxes apparently don't solve the problem, and good sealants are close to non-existing here. I swear, one more week like that, and I will go maaaaaaaad. Or a least madder than I already am
Ugh, I really needed to vent.

I hope your day is better than mine,
Kasia

Wednesday, 17 December 2014

How NOT to anneal wires...

I could title this post also "Why you shouldn't lose focus while annealing " or maybe "Why you shouldn't anneal wires when you're tired"

This won't be a long post. I've decided to make not only the tree earrings, but also a matching necklace. I was finishing soldering the second earring, with only one element left to add. I had to anneal the wire, because it became too hard to properly shape. I started to heat the wire... and kept heating it... and heating... and looking at it, and thinking: "oooooh, those are some pretty lights running up an down that wire... and it looks as if those light are running inside it... and... wait a moment, why is this wire swelling??? Oh, damn, it's not swelling, I've just melted it."
And that is why you should never lose focus while annealing ;P
I'm just glad it wasn't the whole piece.

Just after the annealing fail

After pickling for better view


It's a piece of art on its own ;)

And if someone is wondering why the first thing I did after melting it was to take a picture... it was rather amusing experience, and I decided to document it ;P I also find the shape of that maltreated wire rather funny.